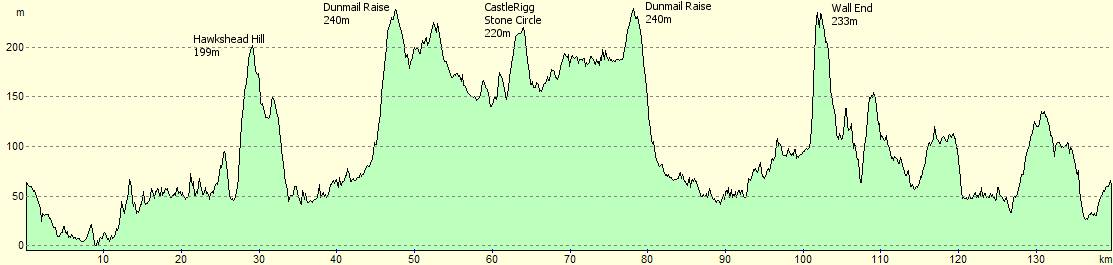
'Rides what I like' - Number 3 - 85 miles.
Ascent: 2,500m
A longish loop from Ulverston through Lowick, Coniston, Rydal, Grasmere, Thirlmere, St Johns in the Vale, to Castlerigg Stone Circle (above Keswick), returning via Great Langdale and Wall End. For a pictorial view of the route, follow the 'Ride in Pictures' link.
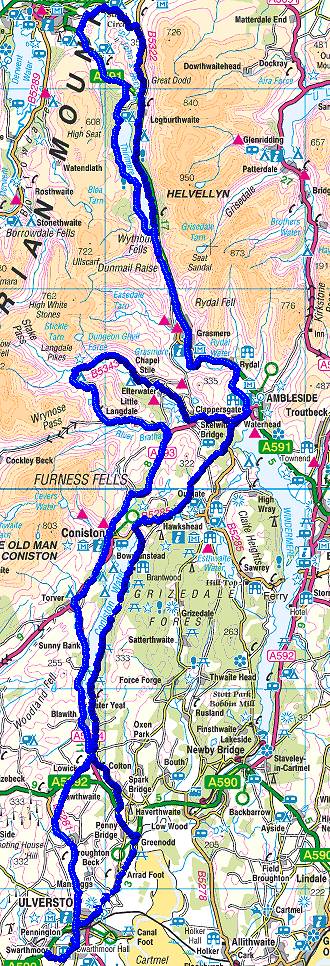 The route
We start at Swarthmoor, but basically, we'll trace the route from Ulverston about 1.5 miles down the road.
For a change, rather than take the back roads out of Ulverston, this trip takes the main A590 for the first 5 miles or so to Greenodd. Sometimes it's a nice change to get a few fast flat miles in at first to get warmed up, and as this is a good few hours ride, we'd normally set off early when traffic is quiet anyway.
Follow the A590 out of Ulverston to Greenodd, where we take a left signed Coniston and Broughton. Carry on past Greenodd and through Penny Bridge. After a short descent, we pass a farm on our left (Little Dicks) and just as the road starts to climb and veer to the left, we take a right onto a quiet lane that runs parallel to the River Crake to Spark Bridge. At the T junction, take a right and then an immediate left up hill. Carry on along this road until eventually (after a bit of climbing) you'll descend to Lowick Bridge. Just before the bridge, turn sharp right and you're now on the East Coniston road. Carry on this road all the way up the side of the lake. A very pretty road with some great views of the Coniston Fells across the lake. After the climb up to the head of the lake, there's a short descent down to the lake shore (an alternative so you don't lose all that height you just gained is to carry straight on through Atkinson Ground, rather then taking the left fork at the junction on the hill - it will eventually bring you out about 2/3 of the way up Hawkshead Hill). We've chosen to do the full Hawkshead Hill climb so, at the lake shore, carry on to the T junction with the main Coniston road, and turn right for the ascent of Hawkshead Hill.
Once at the top of Hawkshead Hill (High Cross), turn left signed Tarn Hows. Follow this road down past Borwick Fold, the Drunken Duck Inn and on to join the B5286. At this junction, turn left and head on down to Clappersgate. Join the A593 at Clappersgate for a short stretch towards Ambleside. Just before you reach Ambleside, look out for a left turn onto a small lane signed 'Under Loughrigg'. Take this left turn and carry on along this lane, running alongside the River Rothay, with its famous stepping stones, which runs out of Rydal Water up ahead. Take care on this road, it's very popular with walkers, as it's a nice easy walk from Ambleside to Grasmere. Once over the second cattle grid on this lane, the road goes over a hump back bridge and joins the A593 again. Carry on here, past Rydal Water - a very pretty lake, quickly followed by Grasmere. At the roundabout, you can take an optional detour into Grasmere, or simply carry on along the main road, to start the climb of Dunmail Raise.
As with any routes around here, there are many ways to go, and, if you fancy, there's a nice quiet back road up through Grasmere, that brings you out onto the main Dunmail Raise climb about 1/3 of the way up. To the left is the bulk of Helm Crag, easily recognisable for the rock formation on top, known as (from this viewpoint) the 'Lion & the Lamb' for obvious reasons. From a viewpoint in the other direction, it is supposed to look like a 'Nun playing an Organ'. Why a Nun I don't know, but I see where they're coming from. To the right is Fairfield and further on, Helvellyn.
Dunmail Raise is a fairly easy, steady climb, not steep, more a long drag. There's a nice farmhouse part way up on the left with wonderful round chimney stacks. At the top the road splits into North and South bound carriageways for a time, before rejoining just as the descent begins. Just before they rejoin, you'll notice the large bronze age cairn between the two carriageways. Folkelore says it marks the spot where Dunmail, King of Cumberland was defeated by the Saxon army of King Edmond and the Scottish army of King Malcolm (here endeth the history lesson). Nice views up Thirlmere as you start the descent. We carry on along this road, travelling up the east side of Thirlmere. The Forestry Commission are at last clearing out the dark conifers that line Thirlmere and replacing them with native deciduous species. It should make the road much more pleasant and offer much better views. The road gradually climbs to the north end of the reservoir and then there's a fast descent down to the right turn which takes us into St Johns in the Vale (B5322).
Just after you enter this valley, you'll see a large vertical rock outcrop on your right, Castle Rock, very popular with the rock climbers. St Johns really is a lovely valley. Very easy cycling and some great views. Along here, you'll catch your first glimpses of Blencathra (Saddleback) and Skiddaw up ahead. Look out on this road for a turn off to the left signed Castlerigg / Keswick. After a short climb and descent, you'll come to a T junction. Take a left here and then you can either take the first left or the second left for the climb up to Castlerigg Stone Circle (or Druid Circle as it's called on an old map of mine). As you crest the hill, the stones are in the field on your left. It would be criminal not to stop here and walk up to the circle and take in the views, If you get the weather, they really are stunning. Whoever put these stones here, certainly knew what they were doing. It has to be one of the finest locations for a stone circle in the entire country. If you walk to the far end of the stones and turn facing the road (north), you have Skiddaw top left, Blencathra top right. On your right are Clough Head and the Dodds (Great Dodd, Watsons Dodd and Stybarrow Dodd) all continuing along from Helvellyn at the southern end. On your left, beyond Keswick and Derwent Water are Grisedale Pike (the one with the noticeable ridge running up it), and various others including Causey Pike, Eel Crag, CatBells and the Derwent Fells.
Back to the road, carry on for a few yards and there's a sharp left turn which takes you onto a narrow lane (single track) that will drop you out at the main Keswick road (A591). Turn left on this road and head off downhill headed back to Thirlmere. After a mile or two, the road splits into a dual carriageway. Just after you start this, keep a look out on the right for a road joining the lower carriageway at right angles. Once you see this, look out for a 'rough' break in the carriageway that allows you to cross and join this road which will take you down the very quiet and peaceful western side of Thirlmere. Even at the height of summer, this road is very cool as it is almost totally in the shade of the thousands of conifers that line the reservoir. At other times of the year it can be positively baltic! Still, a very pretty alternative to the busier east side of the reservoir, plus you'll get occasional glimpses through the trees of Helvellyn rising above the eastern shore of the reservoir. At the end of the reservoir, we rejoin the main road, turning right and heading back up the short climb to the top of Dunmail Raise again, ready for a long fast descent down to Grasmere (as you begin the descent notice the old 'listed' AA call box on your left at the end of the lay-by near the summit). We're carrying on along here retracing our steps past Grasmere and Rydal and eventually, taking the sharp right over the hump back bridge back along the Under Loughrigg Road. At the far end of this road, we rejoin the main A593 turning right to Clappersgate and on to Skelwith Bridge.
As we enter Skelwith Bridge, we take a right fork signed Great Langdale and start off up the Langdale Valley, passing Wainwright's pub and Chapel Style. Some good views up the valley along here, with Pavey Ark, Harrison Stickle and Pike o' Stickle in the distance. It's a fairly easy ride up this valley, then just as you think the road is going to end, it takes a sharp left, climbs what looks like gently for a short while (but somehow never feels like it!) then veers left over a cattle grid and the climb of Wall End (25%) is right in front of you. This isn't a long climb, probably only about half a mile, but it is pretty intense. At the top, it's worth stopping just before the cattle grid and taking a look back. Great views up Mickleden to Rossett Ghyll, and in the evening sun, the shadows on Harrison Stickle etc can look tremendous (in the 1930's/40's my Dad used to carry his bike up Rossett Ghyll, through Sty Head pass to Wasdale Head!).
In front of you is Blea Tarn (always looks 'cold' to me) and you start the descent followed by a stiff dig past Blea Tarn House on your right in the dip which, as far as I'm aware, still has no electricity. There can't be many such places left. At the next cattle grid, you start the swoop down (25%) to Little Langdale, and join the Wrynose Pass road. We carry on over the cattle grid at the bottom and down the valley. A last climb up then a descent past the Three Shires Inn and on down to the Elterwater road, where we turn right, over the bridge and start the climb up Colwith Brow to join the main Skelwith-Coniston road. Turn right here and carry on up. Once at the top, there's a long descent past Yew Tree Tarn and on down to Coniston.
Carry on through the village of Coniston and climb out headed for Torver. At Torver, take a left, a short climb to the top of Sunny Bank and a descent down to the lake shore. Carry on along this road, through Water Yeat and on to Lowick Bridge. At Lowick Bridge, turn right at the Red Lion pub and start a steady slog up past Lowick Church, straight cross the A5092 and continue the gradual climb up to the Broughton Beck road. At the junction, turn left and head off down through Broughton Beck and on down into Ulverston.